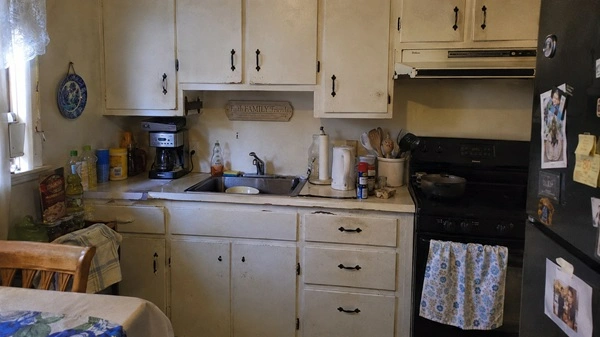
Nothing makes a kitchen feel older faster than tired cabinets. Scratches around the handles, faded finishes, grease stains near the stove, and outdated colors can make the entire room look worn out, even when everything else is in good condition.
The frustrating part is that many homeowners assume replacement is the only solution. New cabinetry can easily cost thousands of dollars, not including installation. Yet in many kitchens, the cabinets themselves are structurally sound. They simply need a fresh finish. That’s where painting comes in.
A well-executed cabinet painting project can dramatically change the appearance of your kitchen at a fraction of the cost of a renovation. Done correctly, painted cabinets can look professionally finished, improve the overall feel of the room, and even increase your home’s appeal to future buyers.
The key is understanding that cabinet painting is less about applying paint and more about preparation, materials, and technique. Skip those steps and the finish may chip, peel, or wear prematurely. Get them right, and your cabinets can look freshly installed for years.
This guide walks through every stage of the process, from selecting materials to applying the final coat, helping you achieve durable, professional-looking results.

Why Painting Kitchen Cabinets Makes Sense
Replacing cabinets is one of the most expensive parts of a kitchen remodel. Depending on the size of the kitchen and cabinet quality, costs can range from several thousand dollars to well over $20,000.
Painting offers several advantages:
- Significantly lower cost than replacement
- Faster project timeline
- Less disruption to your home
- Opportunity to modernize outdated finishes
- Environmentally friendly compared to disposal and replacement
- Increased visual appeal and resale value
A fresh coat of paint can transform dark oak cabinets into bright contemporary storage or refresh aging white cabinets that have yellowed over time.
Many homeowners are surprised by how dramatic the results can be.
Before You Start: Evaluate Your Cabinets
Not every cabinet is a good candidate for painting.
Painting works best when cabinets are:
- Structurally sound
- Free from severe water damage
- Not warped or swollen
- Made from solid wood, MDF, plywood, or wood veneer
Cabinets with extensive damage, loose joints, mold issues, or failing construction may require replacement rather than refinishing.
Take a close look at hinges, doors, drawers, and frames before investing time and materials.
Choosing the Right Paint
One of the biggest factors affecting durability is paint selection.
Cabinets endure far more abuse than walls. They are touched constantly, exposed to moisture, grease, food splashes, and frequent cleaning.
Because of this, standard wall paint is rarely the best choice.
Best Paint Types for Cabinets
Acrylic Cabinet Paint: Acrylic cabinet paints are among the most popular choices today because they:
- Dry quickly
- Resist yellowing
- Provide strong adhesion
- Clean up with water
- Produce a durable finish
Alkyd Hybrid Paint: These water-based paints mimic the smooth finish of traditional oil paints while offering easier cleanup.
Benefits include:
- Hard, durable finish
- Excellent leveling
- Reduced brush marks
- Better resistance to wear
Specialty Cabinet and Trim Paint
Many paint manufacturers now offer products specifically formulated for cabinetry and trim.
These products are designed to resist:
- Fingerprints
- Oils from skin
- Scuffs
- Moisture damage
Always follow the manufacturer’s recommendations regarding primers and application methods.

Selecting the Right Primer
Primer is not optional.
Skipping primer often leads to peeling paint, uneven color, and poor durability.
A quality primer helps:
- Seal stains
- Improve adhesion
- Block wood tannins
- Create a uniform surface
Use a Stain-Blocking Primer When:
- Painting over dark wood
- Covering knots
- Repainting heavily stained surfaces
- Changing from dark colors to light colors
For laminate cabinets, choose a bonding primer specifically designed for slick surfaces.
Tools That Deliver Better Results
The right tools can make the difference between an amateur-looking finish and a professional one.
Paint Sprayer
Professional painters often use sprayers because they create:
- Smooth finishes
- Minimal brush marks
- Faster application
Many home improvement stores rent paint sprayers at reasonable daily rates.
High-Quality Paint Brushes
If spraying isn’t practical, invest in premium brushes.
Look for:
- Synthetic bristles
- Fine tapered ends
- Comfortable handles
Cheap brushes often leave streaks and shed bristles into wet paint.
Foam Rollers
Mini foam rollers work particularly well on cabinet doors and flat surfaces.
Benefits include:
- Smooth finish
- Reduced texture
- Faster coverage
Additional Supplies
You’ll also need:
- Painter’s tape
- Drop cloths
- Sandpaper
- Wood filler
- Tack cloths
- Screwdrivers
- Cleaning supplies
- Safety glasses
- Dust masks
Having everything ready before you begin prevents delays later.
Consider Updating Hardware at the Same Time
Fresh paint often highlights outdated hardware.
New handles and pulls can dramatically improve the final appearance.
Popular finishes include:
- Matte black
- Brushed nickel
- Satin brass
- Oil-rubbed bronze
If replacement hardware uses different hole spacing, you’ll need:
- Wood filler
- Sandpaper
- Primer
Fill old holes before painting for a seamless appearance.
Deep Cleaning: The Step Most People Rush
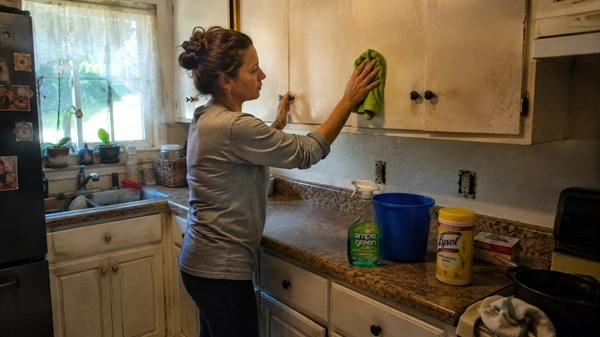
Cabinets accumulate years of cooking residue.
Even surfaces that appear clean may contain invisible grease that prevents paint from bonding properly.
How to Clean Cabinets Properly
Use:
- Mild dish soap and warm water
- Degreasing cleaners designed for kitchens
- Microfiber cloths
Pay special attention to:
- Areas around handles
- Cabinet edges
- Surfaces near the stove
- Upper cabinets above cooking zones
Allow everything to dry completely before proceeding.
This step alone can significantly improve paint adhesion.
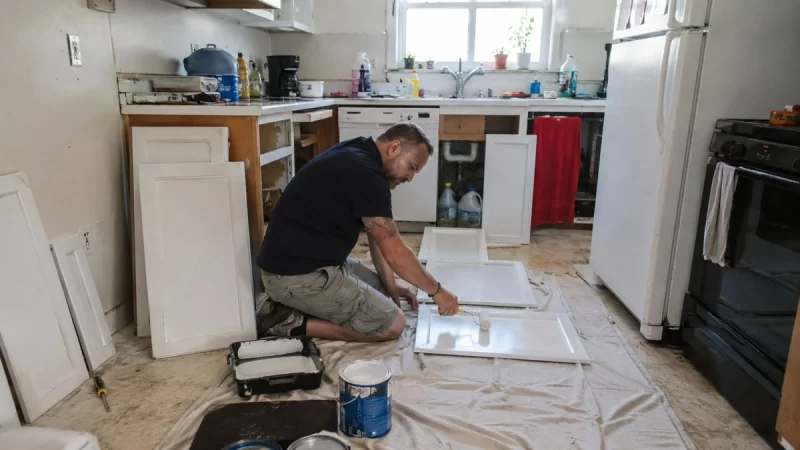
Remove Doors, Drawers, and Hardware
Painting cabinets in place creates unnecessary challenges.
For best results:
- Remove all doors.
- Remove drawer fronts if possible.
- Remove hinges and hardware.
- Label every component.
A simple numbering system can save hours during reassembly.
For example:
- Door 1 = upper left
- Door 2 = upper center
- Door 3 = upper right
Store screws in labeled bags.
This small organizational step prevents major headaches later.
Sanding: Creating the Perfect Surface
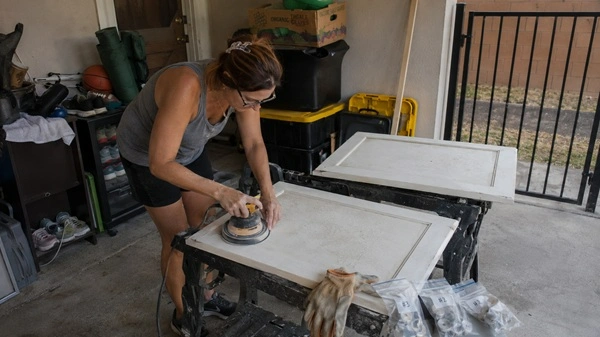
Many people assume sanding is only necessary when paint is peeling.
That’s not true.
Even cabinets in good condition require sanding.
The purpose is to:
- Remove gloss
- Improve primer adhesion
- Smooth imperfections
- Create a consistent finish
Recommended Sanding Process
Step 1: Use medium-grit sandpaper to dull the existing finish.
Step 2: Repair dents, scratches, and holes using wood filler.
Step 3: Sand repaired areas smooth.
Step 4: Wipe surfaces thoroughly using a tack cloth.
Any remaining dust can ruin the finish.
What About Chemical Strippers?
Sometimes sanding isn’t enough.
You may need a chemical stripper if:
- Paint is heavily peeling
- Multiple old layers exist
- Previous finishes are extremely thick
Always follow safety instructions carefully.
Work in a well-ventilated area and wear protective equipment.
After stripping, clean and sand the surface before priming.
How to Prime Kitchen Cabinets Correctly
Professional results come from a systematic approach.
Rather than starting with highly visible surfaces, begin with less noticeable areas.
This allows you to refine your technique before moving to prominent sections.
Recommended Priming Sequence
- Undersides of shelves
- Interior sides
- Interior backs
- Shelf tops
- Cabinet edges
- Face frames
- Cabinet doors
- Drawer fronts
Allow primer to dry completely according to manufacturer instructions.
Do not rush this step.
Premature painting can compromise the finish.
Applying Paint for a Smooth Professional Finish
Once the primer has cured, you’re ready for paint.
This is where patience pays off.
Thick coats may seem efficient but often create:
- Drips
- Runs
- Uneven texture
- Extended drying times
Thin, controlled coats produce superior results.
The Best Painting Method
If Using a Sprayer
Maintain a consistent distance from the surface.
Move steadily and overlap passes slightly.
Practice on scrap material first if you’re unfamiliar with spraying.
If Using Brushes
Always paint in the direction of the wood grain.
Use long, smooth strokes.
Avoid repeatedly brushing areas that have already begun drying.
If Using Rollers
Apply even pressure.
Watch for excess paint accumulation at edges and corners.
How Many Coats Are Needed?
Most cabinets require:
- One coat of primer
- Two coats of paint
Some color changes may require:
- Two coats of primer
- Three coats of paint
White paint over dark wood frequently falls into this category.
Always wait until each coat has dried fully before applying the next.
Ignoring drying times is one of the most common reasons for poor results.
Drying vs. Curing: Know the Difference
A cabinet may feel dry within hours.
That doesn’t mean it’s fully cured.
Drying means:
- Surface is no longer wet
Curing means:
- Paint has reached maximum hardness
Depending on the product used, curing may take several days or even weeks.
During this period:
- Avoid harsh cleaning
- Minimize impacts
- Open doors carefully
Patience helps preserve the finish.
Reinstalling Doors and Hardware

Once paint has cured sufficiently, reassembly can begin.
You’ll likely need a helper to hold doors while attaching hinges.
Check that:
- Doors align evenly
- Gaps remain consistent
- Hinges operate smoothly
- Drawers slide properly
Make small adjustments as needed.
Professional-looking cabinetry often comes down to alignment.
Even beautiful paintwork can look sloppy if doors are uneven.
Finishing Touches That Make Cabinets Look Custom
Fresh paint creates an excellent foundation for small upgrades.
These additions can dramatically improve functionality and style.
Add Crown Molding
Crown molding helps:
- Increase visual height
- Create a built-in appearance
- Blend modern cabinets into traditional homes
Install Interior Organizers
Popular upgrades include:
- Spice racks
- Pull-out trays
- Trash systems
- Plate organizers
- Vertical dividers
These additions often make kitchens feel more expensive and functional.
Add Extra Shelving
Custom-cut shelves can maximize storage space.
Many homeowners discover unused vertical space after reorganizing painted cabinets.
Common Cabinet Painting Mistakes to Avoid
Even experienced DIYers occasionally make errors.
Avoid these common pitfalls.
1. Skipping Cleaning
Grease prevents proper adhesion.
Clean thoroughly.
2. Ignoring Primer
Paint alone rarely provides lasting durability.
3. Applying Thick Coats
Thin coats create smoother finishes.
4. Rushing Dry Times
Allow each layer to dry fully.
5. Forgetting Labels
Unlabeled doors can turn reassembly into a puzzle.
6. Using Low-Quality Tools
Cheap brushes often leave visible marks.
7. Painting Over Glossy Surfaces
Gloss must be sanded or chemically deglossed first.
Frequently Asked Questions
How long does it take to paint kitchen cabinets?
Most kitchens can be completed in a long weekend, although curing time may extend beyond that.
Is painting cabinets worth it?
For cabinets that are structurally sound, painting is often one of the highest-value kitchen improvements available.
Can laminate cabinets be painted?
Yes. Proper cleaning, sanding, and bonding primer are essential.
Should I use a brush or a sprayer?
Sprayers generally produce smoother finishes, but quality brushes and rollers can still achieve excellent results.
How long do painted cabinets last?
When prepared and painted correctly, cabinet finishes can remain attractive for many years with routine care.
What cabinet colors are popular in 2026?
Current trends include:
- Warm white
- Soft greige
- Sage green
- Navy blue
- Charcoal
- Natural wood and painted combinations
However, timeless colors generally provide the longest-lasting appeal.
Other Kitchen Improvements to Consider
Cabinet painting often inspires broader upgrades.
Fortunately, many complementary improvements can be completed without a full renovation.
Consider:
- New backsplash tile
- Updated lighting fixtures
- Modern faucets
- Open shelving
- Hardwood flooring
- Luxury vinyl plank flooring
- Fresh wall paint
- Under-cabinet lighting
Small coordinated updates often create a greater impact than a single large change.
The key is selecting improvements that work together rather than competing for attention.
Conclusion
Painting kitchen cabinets remains one of the most effective ways to transform a kitchen without taking on the cost and disruption of a complete remodel. While the process requires patience, preparation, and attention to detail, the results can rival far more expensive renovations. The difference between a finish that lasts a few months and one that looks beautiful for years usually comes down to the steps completed before the first coat of paint is ever applied.
The most successful projects follow a simple formula: choose quality materials, clean thoroughly, prepare carefully, and resist the urge to rush. With the right approach, even dated cabinets can become a standout feature that refreshes the entire room. For homeowners looking to maximize impact while staying within budget, cabinet painting continues to be one of the smartest home improvement projects available.
Sources and References
- The Spruce Home Improvement Guides
- This Old House Cabinet Painting Resources
- Benjamin Moore Cabinet Painting Advice
- Sherwin-Williams Cabinet Finishing Resources
- National Association of Home Builders